I had a request for some tips on bringing in the Zero Waste Coat and I ended up getting quite carried away with lots of other little fitting notes and ideas so I thought I would share them here! Please excuse my scribbly writing and drawings, I hope it makes enough sense!
Being an oversized shape, as many of my patterns are, and I do love anything oversized, it is off-course nice to add something little to bring it in slightly here or there, we all have such different (and wonderful) bodies the same thing won’t always suit everyone. So below Ive attached some of my tips on simple changes that can make a big difference. And another little note on oversized shapes, I often have customers in the store who are uncertain the oversized shapes will suit them, particularly the more petite ones, then they try it on and it literally can take a shortening of an arm or body length, or a little dart here or there, and all of a sudden it doesn’t look too big (because an oversized shape is not the same thing as a garment being too big for you!) and all of a sudden it actually looks totally proportioned and amazing.
So with that being said here are a few ideas based on the ZW Short Coat shape.
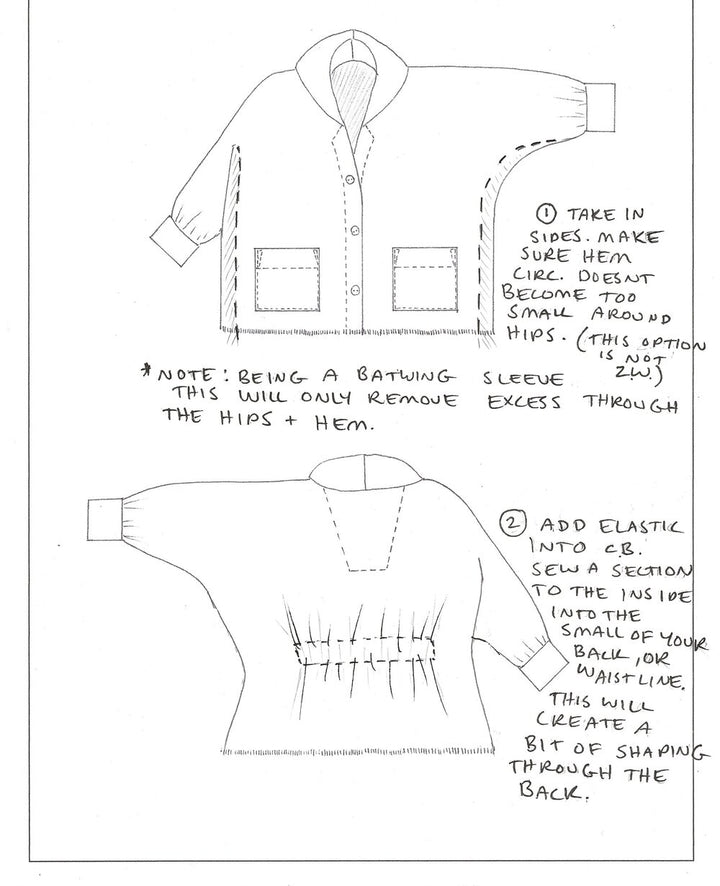
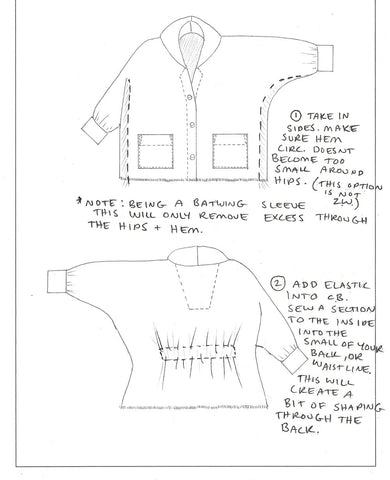
1. This might be the most common sense change, but TAKE IN THE SIDES! Although this will mean it is not a completely ZW pattern, but sometimes it can be worth sacrificing a little fabric, you want to feel comfortable in your clothes and actually wear them, not much point making a ZW garment if you wont wear it because it doesn’t feel quite right! When you take it in I would suggest starting with 0 somewhere under the arm and then bring it out and shape it further under the arm and down through the hem. Keep in mind with a batwing style the top part will still remain quite big, as this is the the style of it, but you can take away extra fabric through the waist and hip, just make sure you don’t make it too fitted around the hip and hem area.
2. Add a section of elastic into the centre back body. This is a great way to add a little shape into your back waist. I would recommend only bringing it in a little, around 10-15cm, you want this to simply hug into the small of your back slightly and create a nice silhouette here at the back of the jacket to give yourself a little more shape.
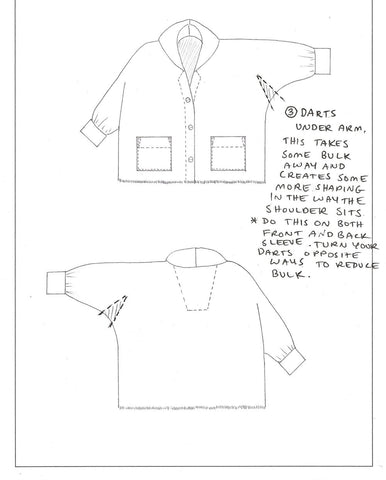
3. Darts into the underarm of the sleeve. This will not make a huge difference overall but can help to remove a little bulk under the arm, it also creates a more curved shape across the shoulder by pulling it down. Do darts on both front and back sleeves at exactly the same point and press the darts opposite directions before sewing your side seam together in order to reduce the bulk here.
4. Belt through the front only. This is a great way to add some shaping in the waist without it being too bulky. Personally this is the only way I can ever belt a coat, or any garment for that matter, as I have quite a short torso and a larger bust so anytime I tie around my waist it shortens me way too much, but If I tie only to the front the back hangs loose and only the front comes in which creates much more flattering shape for me. This is what I did with the Blush Duster, pictured below, and the body of this is a really similar shape to the ZW Short Coat. To do this make a belt from one length of fabric, you may need to add a panel if you need a longer tie than this, and make an opening in the side seams to thread the belt through. I would also recommend securing the belt to the centre back inside of the coat somehow, either stitch it in place, or add a belt loop to the inside of the back to hold in place. This just helps it to not flap around everywhere and stay where it should and also pulls the back in slightly when tied too. You can also tie to the back only if you prefer, this is a nice look when the coat is open.


5. Cross over with no buttons. Due to the shape of this coat it does actually want to naturally overlap across the front. This works great if you are using a waist belt but you can also add a small ribbon tie to the front too if you want the option to secure it without a belt as well.

I hope this has been helpful! You can use one of these, or try a combination to suit your preferences. This is mainly just to get you thinking about simple fit and design changes to make yourself so I hope this inspires some more ideas too!
Birgitta x