This tutorial is based on a jumper I made recently using scraps of left over fabrics to create a textural 'Daisy' on the front of the ZW Jumper.
This is a great way of using up scraps and you can really go all our with it and use many different fabric types and colours. For this particular one I have used more of a tone on tone vibe with a piece of left over natural linen against a natural organic cotton zw jumper.
I would definitely advise stitching this 'daisy' on your garment before you have sewn the whole garment together, ie sew the daisy onto the front body piece. Here I am using a jumper I made a few weeks ago so I am sewing the daisy on after the jumper is already made, not as ideal but as the body of this style is quite oversized its not too bad working this way and I still managed to sew the daisy on very neatly without it being too awkward.

YOU WILL NEED
: Sewing machine
: A gather foot for your sewing machine (you can technically do without it and gather manually, but this will be A LOT more time consuming so I highly recommend getting hold of a gather foot if you can)
: A garment to sew the daisy onto
: Scrap fabric to make your strips out of, you will need the equivalent of a piece that is around 80cm x 80cm (this can be made up of several different pieces and is a very rough estimate, you may need a little more or less)
: A piece of paper to make your daisy template (you can also draw this straight onto your garment if you feel confident doing this
: Sharp chalk or dissolvable fabric pen
: Scissors, ruler, and pins
STEP 1
Prepare your fabric to be cut into strips along the bias.
It is very important that you cut all your strips on the bias, the same direction as if you were cutting fabric to make bias binding. This is important because all the edges of the strips will be left raw and because of this they will fray over time with wash and wear. When you cut your strips on the bias this prevents excessive deterioration of the edges and instead the edges become soft and textural when they fray, instead of having loads of loose threads hanging everywhere!
The best way to cut several strips is to fold your fabric across the diagonal and then fold a couple more times, aligned with the first folded edge. (If you have my book Zero Waste Patterns there is a great tutorial in here on how to do this, under Cutting Binding).
Once your fabric is folded (depending on the thickness, and how good your scissors are, 4-6 layers of fabric should be enough) you can start to draw in your strips evenly across, each 4cm wide. Make sure the strips are straight and a right angle to the folded edge.
Cut your strips apart.


STEP 2
Now you will need to gather all your strips. Attach your binding foot (here I am using an industrial machine so your foot may not look exactly the same as this one) then set your thread length to as long as possible. Start gathering your strips by sewing through the centre of the strips, when you get to the end of one strip add the next one by simply laying it over the top of the last one with around a 2-3cm overlap.
The amount your strips gather in will depend on the thickness of your fabric and how wide your stitch length is set so play around with this a little until you are happy. Here I am using a linen so the gathers are not as much as they would be if I was using for example a thinner cotton fabric.
When you are finished you will need around 6 metres worth of gathered strips. If you don't have enough then cut a few more strips and add to it until it is long enough.


STEP 3
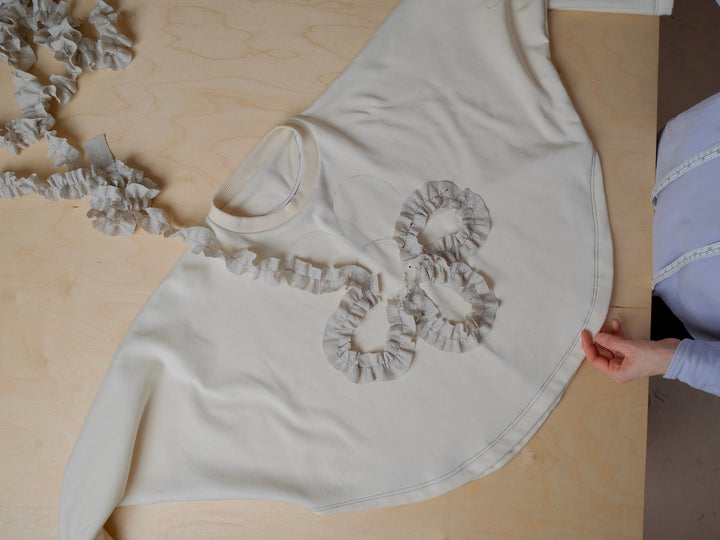
Prepare your daisy template by drawing out a shape on a piece of paper. I personally like mine a little imperfect but it's up to you how evenly you draw this shape. It should have a centre circle and 5 petals, as shown in the images below. The total diameter of the daisy should be approximately 32cm.
Place the template on your garment and work out where you want it to sit. I recommend also pinning the template on and trying on your garment to also make sure that it sits nicely when worn.
Once you have decided exactly where you want the daisy to sit you can trace the shape onto your garment with a piece of sharp chalk or dissolvable fabric pen. You will also need to draw in the rough outline of the inside circle as well.


STEP 4
Start pinning your gathered strips around the outer edges of each petal, the centre point of your strips should sit just inside the drawn on outline. As you go around each petal cut the strips to size, the strips should extend into circle part of the daisy by around 2cm each.
Sew on the outline of each petal, sewing through the centre of the strips as you go.


Now continue filling in the petals with more strips, following the curved shape of each petal, leaving a gap of around 1-2cm between each stitch line (so the edges of strips will push up against each a little once they are sewn on making it quite textural). For this step I would not recommend pinning the strips on as it can get quite tight and difficult to work with, just try to do it by eye. The final strip I have added to each petal is one single length running through the centre with the end finishing at the outer part of the petal folded under slightly.


Once you have finished sewing the petals you can now sew the centre circle. Start by pinning the first part around the outer edge of the circle, making sure you overlap over the edges of all the ends of the petals, to neaten these off. Once you have got the outer circle pinned start sewing it on through the centre of the strips and then continue going around and around until you get to the very centre of the circle. Leave a similar gap between each as you did for the petals.


STEP 5
Once you have finished sewing the entire daisy use your fingers to fluff it all up and even it out a little, you can also cut away any loose threads or uneven parts if you wish.
And now you have your finished Daisy!


