This is a little tutorial to compliment the ZW BLOCK PANT - FLY FRONT HACK with an alternative option to the ZIP used in the previous tutorial.


When we make stock for the shop we almost always do our pant fly's with buttons instead of a zip. WHY? Because it makes it easier for the life of the garment, firstly it is much easier to replace a button than a zip, and also at the end of its life if the garment gets sent for textile recycling the buttons can be removed super easy. Also I just think it looks super nice!
So in this tutorial I will only take you through the steps of putting in the button fly here, for all other steps of doing this ZW BLOCK PANT hack you will need to refer back to main ZW BLOCK PANT - FLY FRONT HACK TUTORIAL.
SO before starting it is good to know that you pretty much do everything the same as you would inserting a zip, except for you dont sew the zip in and instead attach an extra piece on the inside of your pant where the fly facing is, which is for your button holes.
Starting from step 5 of the main tutorial, you will need to prepare one extra piece, your 'button fly'. This piece has not been factored into the cutting plan so you will need to cut this separately. If you have some left over fabric from what you have used to make your pant then cut from this, otherwise it is also perfectly fine to cut this from a contrast fabric as it is not fully visible from the outside.
STEP 5. FLY + BUTTONS
5a. First start by cutting your button fly piece and keep in mind this is an EXTRA piece from what you have already cut for the fly in the previous tutorial. This should measure 8.5cm wide by the length of your fly pieces you have already cut from the main plan. Fuse one half of this piece and then fold in half lengthways, right sides together, and single stitch and turn out the bottom edge. Press in half and overlock the raw end to finish.


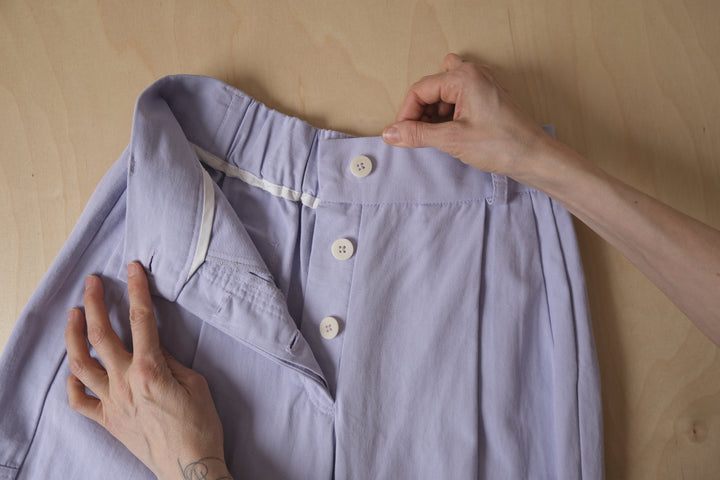
Mark your buttons holes. I like to start my first button approx 4-5cm down from the top, and my second 6-7cm down from the first button. depending on your fly length you may want 3 buttons, but for me 2 here usually works great.
Make sure that your button holes start around 1.25-1.5cm away from the folded edge, otherwise your buttons may be a little visible from the outside of your pant.


Sew your button holes and cut open using a quick unpick.


5b.
Overlock your centre front pant seams separately and attach your fly pieces to your front pants.
Below you can see your right pant requires the fly facing (piece 2) and your left pant requires your fly placket (pieces 1). Start by sewing together your fly plackets, right sides (pieces 1) together, with 0.5cm S/A. Press the seam away and edge stitch to hold in place. Turn back the bottom edge and bag out with 0.5cm S/A. Once you have bagged out and pressed this piece, sew together the other edge, raw side, and finally overlock to finish.


5.c
Attach your fly facing (piece 2) to your right pant. Start by overlocking the side and bottom of your fly facing, then attach the non overlocked side to your centre front (CF) pant, with right sides together and 1cm S/A. Press the fly facing and all seams away from the CF and edge stitch down.


Sew together your centre front crutch, finishing around 2-3cm past your fly facing and then attach your fly facing to the left centre front pant (sorry missing a couple pics here but basically you need to do everything you do in the MAIN tutorial step 5, but WITHOUT sewing on the ZIP, and don't stitch down the fly facing yet!).
Below shows the fly facing and fly placket sewn in with an outside and inside view.


5.d
Attach your pre prepared button fly to the right centre front pant by placing it on top of the fly facing on the inside of your pant. Pin in place making sure that you keep it a few mm's away from the edge so that it is not visible from the outside of the pant. Also make sure that you pin trough all layers and keep your fly placket on the other side out of the way.
Stitch down your fly facing and button fly to your pant all in one with 2 rows of stitching to ensure that you catch the button fly into the stitching. At the end secure your fly placket by doing a stitch through all layers at the bottom corner of your top stitching. This is to ensure that your fly placket does not flap around when worn! (All of this is again very similar to the MAIN tutorial, just without the ZIP!)


5.e
Now mark out and attach your buttons. I have shown this step below before the waistband has been attached but I would recommend doing ALL the buttons at the end when the pant is totally finished.


And here we have the finished pant!


I hope you enjoyed this tutorial!
Happy Sewing!
Birgitta x

