This is a simple hack that you can use with the ZW Cropped Shirt and the ZW Gather Dress pattern. For this hack you will need a little extra fabric. For anyone wondering, no this is not the same hack that you get with the ZW Gather Dress, it has EVEN more gathers, GLORIOUS! Below are some little bits of info you will need to get started.
ZW CROPPED SHIRT : you will need an extra 44cm of fabric. You will loose your back hem facing by doing this hack.
ZW GATHER DRESS : you will need an extra 31cm of fabric. You will loose your pockets to do this one. Sad but true (unless you find some scraps and put them in anyway, because let’s be honest, everything is ALWAYS better with pockets)

This gather sleeve uses nearly an entire width of fabric for each sleeve which is why it creates such a lovely voluminous look. For this tutorial I am applying it to the ZW Cropped Shirt. I also added around 5cm in length to the body as I didn’t want it so cropped, and I also made my front neck band narrower (cut 7cm wide, finished width 2.5cm) but these details are up to you to decide.
CUTTING: Instead of cutting the current sleeve section (for the Shirt this would be the section with sleeves and back hem facing, for the dress the panel with sleeves and pockets.) You will cut 2 strips that are 34cm wide by the full width of your fabric. You will cut away a sleeve hem band that is 7cm wide from on end of each piece. Keep in mind this sleeve band width is determined by the length of your sleeve so if you are planning on making your sleeve shorter keep this in mind as you don’t want this to end up too tight. See diagram below.
Your underarm notch will now be 31cm down from your shoulder.

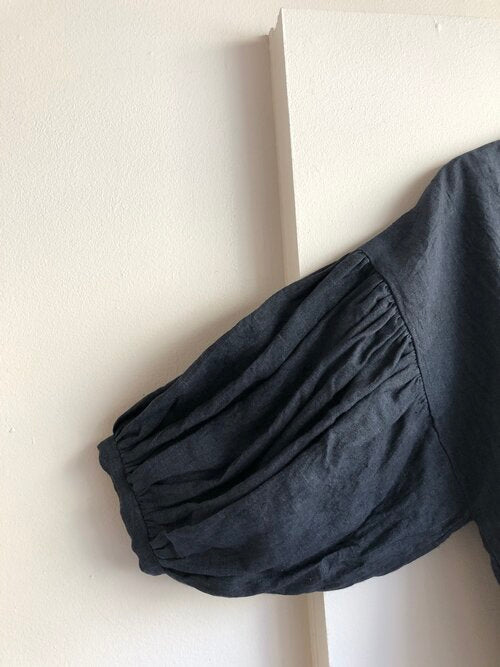
SEWING: Start by doing your gathers. You will need to gather the entire bottom hem end of each sleeve to fit to the length of your sleeve hem band, it will seem like a lot of gathers but this is what will make it so great and it does fit. Then gather the top part of your sleeve (the shoulder), start 11cm in from each end, this is so that you don’t have a lot of gather in the underarm part of the sleeve/armhole.

Next sew together your sleeve seams, and join your sleeve hem band so it is in a circle. Attach your sleeve band from the inside of the sleeve (wrong side) first, this is the same as how you would attach your neck bands. A little extra note here, I like to work on finishing the sleeve completely first before attaching it into the armhole of top as its easier to work with.
Make sure you sew on your gather side, I always do this to ensure that they are evenly sewn and aren’t accidentally tucked over anywhere. As this is a fairly narrow hem circumference it will be a lot easier if you have your sleeve turned wrong way out and sew inside the circular sleeve, you should be able to see whats happening from the pictures below. Once you have sewn to the inside, turn the band around to the front and top stitch down. You now have a finished sleeve.


Now attach the other end of the sleeve into the armhole. Make sure you sew on the gather side here as well. My main tip here is to sew a small section first in the underarm to hold it in place and get right into that underarm seam/corner section. Then turn over and sew the rest on the gather side.


And thats it, done! I made a couple of shirts using this sleeve, one in a thinner white cotton, and also in a heavier linen, both worked out lovely so you can definitely try it out with some differents weights. It would look super nice in a print too!
Birgitta x


