‘What are the facings used for, what is their purpose?’ and ‘how do you sew the facings in?’
These are some of the main questions I get for these 2 patterns, the ZW Gather Dress and the ZW Cropped Shirt, and understandably so. Often some of the steps when sewing Zero Waste garments can be a little different from cutting and sewing a ‘regular’ pattern. I say ‘regular’ as a very loose word as off-course there is not one way to do things and everyone has their own techniques and special clever ways of doing things, but often with ZW you do need to think a little differently for some pieces, in terms of where they are going to fit in, and how to sew them into the garment. I love to always try and find a ‘useful’ use for every piece when making a Zero Waste pattern, one thing that particularly irks me is things like fake pockets, and embellishments that have no real function or purpose, but sometimes you do have the real problem of needing to find a use for a shape in a ZW pattern that doesn’t easily fit anywhere. A good way to do this is FACINGS!
SO there is actually a ‘real’ use for facings a lot of the time, it can add an extra layer of strength to a garment, or help to finish the inside of a garment nicely, because let’s face it, the inside of the garment deserves a bit of love too! I will be doing this tutorial using a ZW Gather dress, but the same steps really apply to the ZW Cropped shirt as well. Apologies for the dark fabric but this is what we had prepped to sew in the studio today!
So let’s begin. First i’ll explain the pieces then I will go through the steps of attaching each one into your garment.
THE BACK NECK FACING.
This is attached into the CB neck on the inside, or ‘wrong’ side of the fabric. It is made using the back neck-hole cutout. I almost always put a facing into the CB neck of garments, and mainly this is so that we can attach a nice little label into the back, but this does also add a little extra strength here to support the neck band which you will attach later.

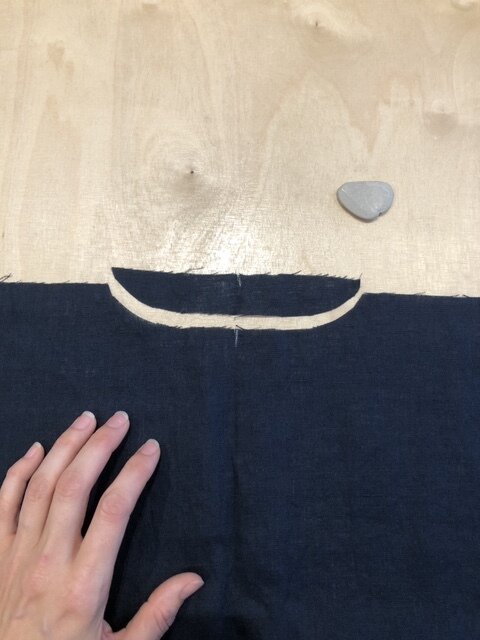
THE SIDE SEAM FACINGS.
These are the little triangular pieces that you end up with when cutting out your centre front necklines. I guess technically speaking you could say these don’t have a ‘purpose’ , but it actually depends on how you look at it. They are attached in such a way that you do end up covering a little of your side seam and it makes the garment look lovely and finished on the inside, and also it does add a little more weight here into the hem, as well a design detail with the triangular stitch line. You can also use these facings in a couple of other ways, for example a similar facing (although round) is attached into the ZW Workwear Jacket, but it is used in this instance to face the splits in the side seams. If you want to get adventurous you can do the same thing here with your ZW Gather Dress. You can also use this facing in the ZW cropped shirt to sew into the side seams at the hem line to add a little more width here. These other applications can be saved for another tutorial, but on that note this is actually something I really love about these patterns, that as you add to your collection and learn how to make each new piece, you can actually mix and match a lot of the techniques used in many of the garments so you can put your own design spin on things.

Now thats probably enough about what these pieces are and what their ‘purpose’ is . Let’s move onto how to put them into your garment.
ATTACHING THE CB FACING
Start by pressing up the curved edge of your facing, 5mm or so. Then turn it over and pin it into the back neck of your bodice (on the inside of the garment) leaving the top edge raw. This edge will be covered later by your neck band and neaten things up.


Now sew the top edge along the neck down, around 5mm down (keeping in mind your neck band will cover this later with around 1cm S/A). Then sew down the curved edge flat to the back bodice right along the edge. This is where we would add our label in, you could also add a little loop of cord or bias tape here and use it as a hanging loop. And thats it! Now you leave it for later and move onto the other elements of your dress! (or shirt)


SIDE SEAM FACINGS
These ones are little more tricky to sew in but if you follow it step by step it truly isn’t so bad.
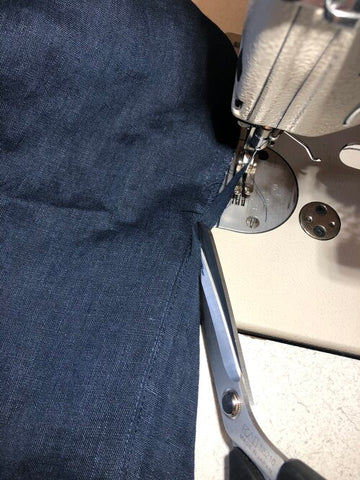
Start by pressing in sides of the triangular facings, around 1cm, not the edges on the straight grain but the angled edges.


Now for the next stage you will need to have the side seams of your skirt (or your shirt) sewn together and I would also recommend pressing the hem up to the the finished length all the way around, this will make it easier to see where your facing needs to sit, also press your side seams to the back.
Next you attach the the side seam facings, along the straight edge into the side seams. first attach it onto the front skirt, it needs to start around 13-15cm up from the raw hem edge. You need to place it far enough down that when you fold up your hem the facing is covered by it.


Once the first stitch is in place you can press it to the back, top stitch it down to hold it to the back (optional) and either tuck under the top little triangle seam allowance or trim it away, if your fabric is a little thicker. OOOPPS not Zero Waste! but save it to stuff a pin cushion or something!


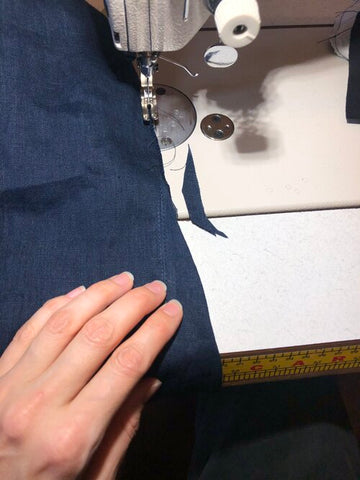
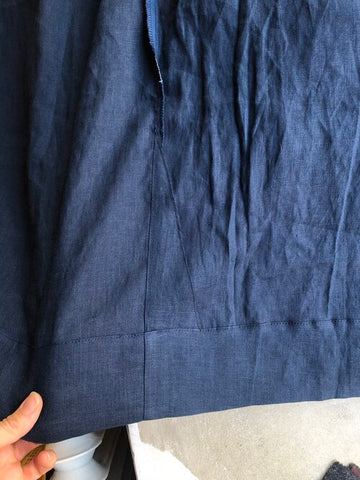
Next pin up your hem all the way around ensuring you tuck your facing into the hem and that it is sitting towards the back of your garment. Now top stitch your hem down all the way around, and lastly stitch down the triangular piece of your facing, starting at the side seam and finishing flush up against your hem stitch line.


And thats it done! I hope this tutorial was helpful, next we will be doing the second most common question, neck bands!
Bx

