
This is a lil tutorial for the Zero Waste Cropped Shirt pattern on how to finish the seams nicely. There are a couple of ways to go about this and it really depends on what sort of equipment you have at your disposal. The simplest way would be to straight stitch and overlock the seams, a little more on the steps and order of this below. If you don’t have an overlocker (or even if you do) you could go for a slightly more complicated route, which has a really lovely finish inside. The cool thing about this top is that you can use the side seam facing pieces (the cut-outs from your front neck) to neatly cover the side seams so no overlocking is needed at all. Once you have sewn up your hem you will have a beautiful finish on the inside. Using this option is also great if you want to go for a completely hand stitched garment (very time consuming, but it is absolutely possible if you don’t have a machine).
I have outlined 2 options below, with quite a lot of images, I hope it isn’t overkill but just want to make sure anyone with even very basic sewing experience could also get some good tips from this!
Option A
Single stitch and overlock.
This is the most straightforward way to make this top and follows how the steps are outlined in the Pdf pattern booklet. You will be doing a single stitch and overlock on your shoulder seams, side seams (starting from underarm notch down) and your armhole seams (or armband attachments).

1. Single stitch and overlock you shoulder seam.


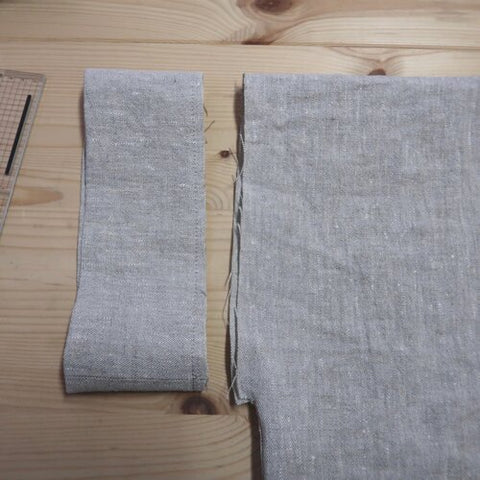
2. Single stitch and overlock your side seam, starting from the underarm notch. Make sure the notch is cut 1cm deep and that you start stitching at exactly the 1cm point. (This is actually a little different from the pdf pattern tutorial, if you want to cover the entire S/S with your facing you will need to do facings before attaching sleeves).


3. You will now need to attach your side seam facings, stitch onto the front side seam first, fold the top of the facing down approx 5cm and line the folded top edge right up to the underarm notch, so you are essentially covering the entire side seam with the facing (the bottom part which is still raw will be covered when the hem is turned up). After this press your facing to the back, if your fabric is thick you will probably need to trim away a small section across the top. Edge stitch the facing approx 1mm in.


4. I have skipped a few steps here as I am just focusing on how to finish the seams nicely in this tutorial. You will need to completely finish the rest of the top before doing this, except for the sleeves. At the very end single stitch your sleeves in, making sure you match your armband seam to the underarm notch point. You will need to get your needle exactly at that start point again. Finally overlock, run your overlocking off with a tail at the end and neatly tuck underneath and stitch in place so it doesn’t unravel.


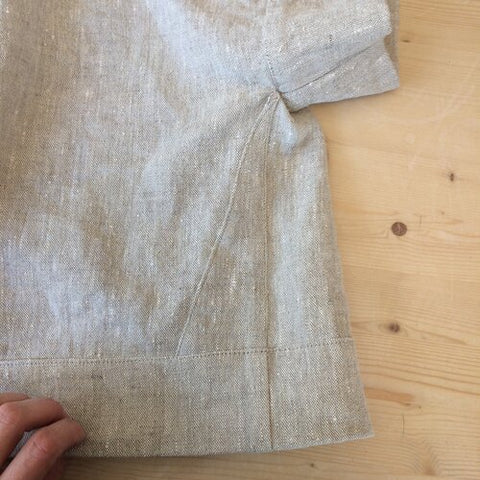
And there you have it, now your seams look like this……


OPTION B
FRENCH SEAM AND BAGGED ON SLEEVE BAND.
Now for your second option. You will do everything the same here with your side seams (as outlined in steps 2 + 3 above) but instead you will be doing a french seam on your shoulder, and attaching your sleeve band differently. For this option you will only sew the side seam together of your sleeve, do not fold in half and stitch together.
-
French Seam your shoulder (sew with wrong sides together first with a 5mm seam allowance. Trim away an neaten the edge, press to the back, turn your garment inside out and do your second stitch approx 5-6mm in).


-
2. Refer to steps 2 + 3 from option A here. Single stitch and attach your side seam facings, then finish your whole garment except for your sleeves.
3. Attach your sleeves by sewing to the inside first with a single stitch, right side sleeve to wrong side body. Make sure your sleeve seam matches your underarm notch. Then press your seam down towards the sleeve and fold the sleeve band up to create your band. Fold the end under 1cm, press, pin and stitch down. (You could also try this the opposite way, stitch to the outside first then fold to the inside and hand stitch down, this way you have no stitch line visible from the right side of the sleeve)
To be honest I do find this to be a little bulky when using a heavy fabric, such as what I have used for this tutorial, but it is really lovely with a lighter weight….


-
Your seams now look like this…..

-
And there you have it, I hope that all made sense! Here is my finished piece from today….I finished this top with a simple little button and hand made loop, which I will save for the next tutorial.
Happy Sewing!
Bx

