Ok so we have 2 tutorials up in quick succession today, after quite a long time between the last ones, I finally found some time and decided it was best to get both of the most important ones on my list finished, otherwise lord knows how long it will be until the next one!
I have touched on this previously but wanted to do a more in depth tutorial. This tutorial will show you the best way to attach the Neck Band for the ZW gather dress and ZW Cropped Shirt, according to me anyway! Now I will admit the way I have shown these steps in the pattern is sometimes suited to a more industrial machine, and can also be pretty tricky for a beginner, especially if you are working on a particularly shifty fabric that stretches out a little or is a little thin and wont behave so nicely. So for this reason I have also added some troubleshooting at the end. I would recommend reading all the way through and deciding which method suits you best after that.
SO attaching the neck band. Here we are using a ZW Gather Dress, but the same method applies to the ZW Cropped Shirt.
Firstly this is the last thing you will do to your garment so before you can attach the neck band make sure the rest of your dress or shirt is sewn together, including facings attached and hems pressed up and finished.
Take your 2 neck band pieces and sew together the CB seam with 1cm S/A and press open, this is the end with the double notches. Make sure that you have also put your other notches in. For the Dress this will be your shoulder notches, and also your waist seam notches. For the shirt you only need your shoulder notches.


Next turn back both ends of your neck band and sew with 1cm S/A, then turn the ends out.


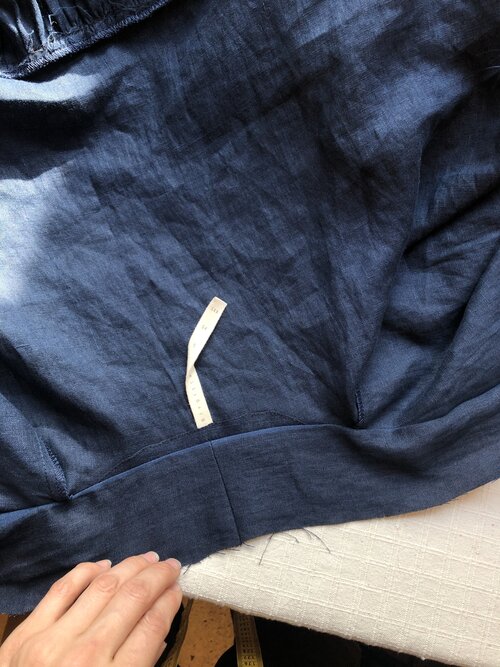
Next you will need to pin your neck band onto your dress, from the inside first, right side to wrong side and using the selvage edge. Make sure you match your CB neck band seam to your CB notch on the back bodice, as well as your shoulder notches and waist seam notch. The bottom part of your band should be pinned to match your hem line perfectly.
An important thing to note here is that the front neck line stretches out quite a bit so it may seem like it wont fit but in actual fact it is very important you ease this part onto the neck band as otherwise it wont sit nicely over the bust. If you are working on the ZW Cropped Shirt I would recommend pinning your back neck first up to the shoulder seam part, then a section of your CF bottom part, the straight part, and lastly pin your front neckline to the neck band so whatever is left simply needs to fit in. Make sure you also gently curve off the point where the V of the neckline starts


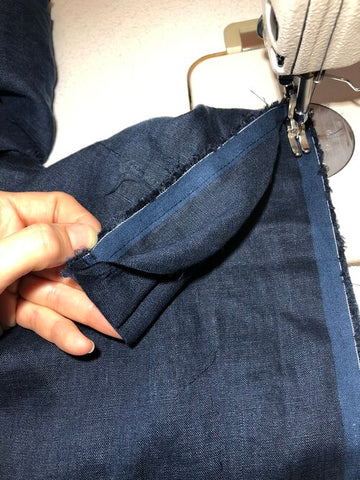
Once pinned on you can sew the first part. Sew your neck band on, make sure you do this on the neck band side (your feed dogs, the little jagged metal things on the table of your machine under the foot, help to pull in the underneath of whatever you are working on, if this is a little stretchy or not on the straight grain, this is a good thing to know actually as anytime you are sewing a more solid piece to something that may have a little give, ALWAYS sew on the solid side. i.e. if you are easing one piece onto another, or attaching a fused waist band to the top of a pant, always sew from the least stretchy side….anyway little bit of a side note there)
Once sewn all the way around press the neck band and seam allowance away from the garment, then double your neck band over, turn in your 1cm seam allowance and pin in place all the way around, making sure the band is sitting even and straight. I recommend pinning across as per the pictures as this means you can actually sew over the pins (being careful off-course) and this keeps your band in place exactly where it should be, as this is where you can have problems with the band stretching down and not sitting nice and flat.


Now you need to top stitch your neck band down from the good/front side of your garment. The best tips I can give here are to make sure you keep your pins in place and as you sew each section pull the band tight from both ends. This is where if you are a beginner or have quite a lightweight domestic machine it could get a little tricky, so if you are tearing your hair out trying to get this bit neat I would recommend looking at the trouble shooting section at the end of this tutorial for some other options. This technique tends to work best for really solid non shifty fabrics, like cottons etc, you know those fabrics that are super pleasant and satisfying to sew because everything just stays straight!
Once you have done this final stitch give the neck band a nice steamy press and it should come up beautifully!


TROUBLESHOOTING
OK so if you just cant seem to get the band sitting nicely, or if you have a shifty fabric, or are a beginner, you can just skip straight to this section instead. Even though I do love to finish the neckband as per the above, and if everything works out it is a great way to neatly and efficiently do this, the truth is sometimes it is super hard to get perfect. So instead there is another way, and perhaps this is actually the more commonly used way when it comes to home sewing. As well as this other technique I will also outline some other troubleshooting things below which could be helpful.
ATTACHING NECK BAND OPTION 2
Basically this way is doing it the opposite to the above. Attach your neck band from the front of the garment first (on the non selvage side) then press the band and seam allowance away from the body, and pin in place on the inside of the garment. Now you will sew down the band, from the front of the garment still, but as you sew you will catch in the other side of the band on the inside. If doing this you will need to make sure that it is pinned in place just ever so slightly past the seam line so that you don’t miss it when sewing as you wont be able to see it. But doing it this way really does help to keep the top part flat. You can also hand tack the underside of the band in here, by catching the stitches from the first seam you have sewn as you go along. This is off-course more time consuming but it does finish beautifully and works well for silks and really thin slinky fabrics that aren’t behaving so well.


SELVAGE ISSUES
I try to always use the selvage in these garments but sometime you will have a fabric that has a pretty difficult one to work with. If your selvage is pulling the band in a lot ( a little is ok, but too much is not good) then I would recommend cutting the selvage away, and this would apply to the entire garment, as it can pull the seams up and make it look a bit wavy, not cool. This means no Zero Waste, BUT a good use for the selvage is to save them as ties. I always save mine and use them to tie around parcels and when wrapping presents as a ribbon. They come in handy more often than you would think!
FUSINGS
Occasionally you might want to use a light weight fusing in your neck band, if it is really fine fabric that needs a bit of structure. But to be honest I never do this myself as I think it can make it too heavy. I find that the 4 layers of seam allowance make the band quite thick already and if you take a liberal 1cm S/A (somewhere between 1.2-1.5) then you will find that your button holes will go over the seam allowance so it is stronger than you would think. In regards to the ZW Cropped Shirt, as this is a wider width neck band you could fuse for really thin fabrics, but again as long as you use something with a bit of structure this should still work well without. I used to use fusing a lot more but these days I really only use it for things like pant waistbands, or really heavy coats. Personally I prefer to work more with the natural drape of each fabric, rather than adding too much bulk.
Well I think thats about it for troubleshooting, once again I hope this was helpful!
Bx

