This is a hack using the ZW Bell Jacket which outlines the sewing steps. The full cutting plan can be found in the Instruction Booklet.
This blouse should be cut out in a very similar way to the jacket pattern , except you use pieces C to finish the inside of the neck, and the collar is square, and is made from the pocket pieces. There are also no hem darts on the sleeve (although you can opt for this instead if you wish) and instead there is an elastic to bring it in art the wrist.
1. Start by sewing your blouse body and sleeves together. Sew the CB inverted box pleat, shoulder, which should be overlocked together as well, and then sew the underarm of the sleeve and overlock edges together, then sew the sleeve into the body armhole, matching the notches, and overlocking the seam together. You should also prepare your back neck facing, sew together at the centre back, press seams open, then attach a binding to the curved edge. Make sure you pin the inverted pleat on the back body to hold it in place for later.


2. You should now attach an iron-on interfacing to one of the collar pieces (G) and to the centre front edges of the front bodies, up to the width of the first notch and down the whole length of the centre front. Press in the centre front edges on the front bodies to the inside by 1cm, and then press in again to the first notch, all the way down to the hem.


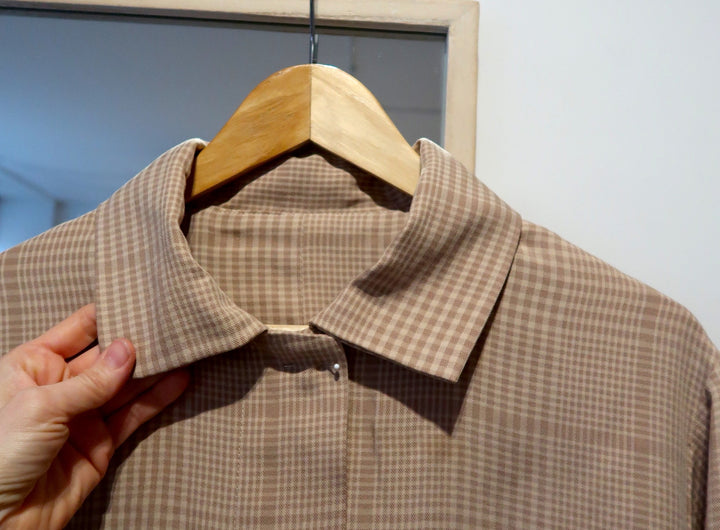
3. Take your collar pieces and place them right sides together, sew across one long edge with 1cm seam allowance. Press the seam to one side and then do an under-stitch close to the seam, this side with the under-stitching will be your under collar. Fold the collar in half lengthways with right sides together and sew together each end. The amount of seam allowance you take here will depend on how long this piece is (it can vary slightly depending on how long you have made your sleeves in the cutting plan). The finished collar width for a size ONE= 47cm (shown in the pic below), and a size TWO= 49cm. Turn the collar out the right way and press, then sew together the other long edge with a single stitch around 5mm down from the raw edges.


4. Place the collar onto the back neck, the under-stitched side of the collar against the right side of the body. Pin in place along the neck making sure that the centre back point of the collar matches the centre back pleat on the body, and that the finished edges of the collar match the notches on the front necks. Sew together with a 1cm seam allowance. Check that at the shoulder seam it is sewn correctly so that it sits neatly at this point.


5. Take pieces C (front neck binding) and place right sides together in pairs. Sew together along the curved edge with a 5mm seam allowance. Press the edges to one side (so that you end up with a pair) and do an under-stitch along this edge close to the seam to hold down neatly. Press and stitch together on the short and long straight edges, around 5mm away form the raw edges.


6. Turn back the centre front edges to the first notch, right sides together, and stitch together at the top edge. I like to angle my seam down slightly so that it is a little lower at the centre front, you can do a 1cm seam allowance at the 'collar' point and then angle down to around 2cm seam allowance at the centre front edges.


7. Now place one of the front neck binding pieces (C) and place the long edge on the front neckline seam, the under-stitched side facing up. This piece should extend past the centre front turn back around 2-3cm. Pin in place starting around 1cm into the turn back and finishing at the shoulder seam (piece C should extend past the shoulder point a couple of cm here as well). Stitch together between these pinned points ONLY with a 1cm seam allowance. Press away from the body and then under-stitch along the part that has been sewn to the neck to hold the seam down neatly here.


8. Turn the centre front folded back edges the right way out. Press and pin in place down the centre front and stitch down the folded in 'placket' close to the edge. This stitch will catch in the front binding pieces as you go, make sure these are sitting neatly at this point, at an angle that gives enough for the front neck seam to sit nicely.


9. Place the back neck facing onto the back neck, right side facing against wrong side body, to cover the seam allowance along the neck. Pin to the back neck between the shoulder points only and stitch together with 1cm seam allowance. Press the facing away from the body and do an under-stitch along this sewn edge to hold the seam down neatly here.


10. Now pin the loose ends of the front neck binding to the shoulders at a right angle. Sew to the shoulder seam then sew the remaining part of the back neck facing to the shoulder seams, as far as you can up to the neck point. You need to take more seam allowance on the back neck facing, as shown in the photos, this is similar to how much extra is taken when attaching it to the bell jacket. This part can get a bit fiddly so spend some time making sure that it will be sewn at just the right spot so that the shoulder and neck seams sit neatly on the outside as well, once done.


11. Turn the back neck facing to the inside of the garment, wrong side to wrong side. Press and pin neatly in place, making sure that the centre back pleat is held neatly in place. Top stitch the facing to the back neck so that the stitch is visible on the outside of the garment as well. Do a top stitch on the front neck seam, around 8mm down from the top to hold everything neatly in place here. Working from the right side of the garment stitch from the start point of the centre front placket stitch line up to the shoulder seam.


12. Overlock all 4 edges of the pocket bags to stop the seams from fraying too much. Press down the top to the wrong side by 2.5cm and top stitch in place with 2 rows of stitching. Press in the sides and bottom edges to the wrong side by 1cm. Pin pockets to the front of the blouse to your preference. I have placed mine approximately 47cm down from the shoulder seam, and 8.5cm in from the centre front edge. Top stitch down working a triangular stitch on the top corners to strengthen here.
*TIP: if the pocket drapes down a lot when worn (this can happen when using a soft drapey fabric) then you can add a vertical button hole to the inside centre point of the turn down on the pocket bag, before stitching this down, and then add a button corresponding on the body of the blouse. This will be a little concealed button and button hole and it will hold the pocket in place nicely at the top. (You can off-course choose to do a visible button and button hole if you wish instead!).


13. Turn the hem to the inside twice by 1cm and top stitch the hem in place.


14. Now press the sleeve hems to the wrong side by 1cm, then press up again into the wrong side by 2cm. Stitch down leaving an opening of around 3-4cm. Thread the elastic through with a safety pin then join the two ends with a zig zag or 2 rows of top stitching. Stitch the opening closed and even out the gathers.
*You should now add button holes and buttons but I do not have specific images/steps for this! For mine I added x5 button 1.5cm wide. The button holes run vertical down the right side, starting around 2cm from the top edge on, and then the other 4 spaced evenly apart by 11.5cm. Buttons sewn to the left side to correspond.


And now it is finished! Here is my completed blouse below (still missing buttons!)


