These are further images to help in sewing the collar to the ZW Bell Jacket outer and lining. These instructions are particularly difficult to explain with just text and illustrations, as is done in the PDF Instruction Booklet. I hope these images serve as a better reference to working through these steps! The collar is attached in this way to reduce bulk along the neckline. When you are working with coating fabrics it can become very bulky through these seams so this method helps to reduce the bulk as much a possible.
*The sewing steps are numbered in order based on the PDF Instructions Booklet.
STEP 5H
Sew a binding strip onto the left and right centre front edges of the OUTER body.
The method of attaching binding below is a little different from the usual attachment, this is a way that reduces bulk, it is great to use for edges that won't be visible from both sides once the garment is made. I learnt this technique from one of our super star interns a few years ago (shout out to Bettina!). I have been sewing for over 20 years and it just goes to show you never stop learning!
With this method start by attaching the binding to the right side of the garment first, right side binding to right side garment, with a 1cm seam allowance, then press away from the body. Fold the binding to the inside of the garment along the very centre front edge of the body. Pin in place then stitch down from the right side by stitching in the ditch.


STEP 5I
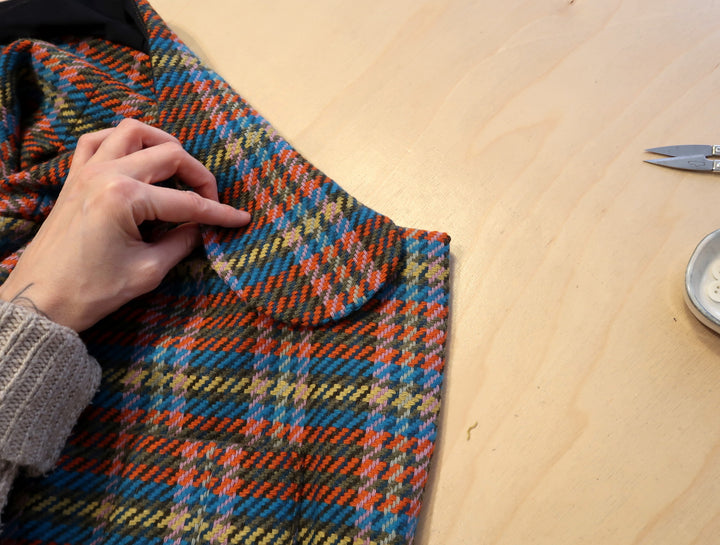
Place the LINING side of the collar onto the neck of the OUTER body, right sides together. Match centre back seams together and continue the collar around the neckline finishing at the second notch away from the centre front neckline. Pin in place and sew.


STEP 5J
Place the OUTER side of the collar onto the neck of the LINING body, right sides together. Match centre back seams together and continue the collar around the neckline finishing at the first notch away from the centre front raw edges of the lining body. The start point of the collar on the front neckline should finish right up against the start point of the LINING collar sewn during step 5I. Pin in place and sew.


STEP 5K
Fold back the top edge of the centre front neckline to the first notch, right sides together and sew across the top edge with a 1cm / 0.375” seam allowance. You will need to move away the front part of the lining, up to the start of the collar, out of the way, so that you don’t sew over this. The bound edge of the centre front body should sit flush up against the start of the collar and the start stitch point where the lining is attached. Once sewn move the lining back over the top edge, the centre front raw edge of the lining should sit along the folded centre front edge of the OUTER. Pin in place along the neckline from the centre front to the shoulder point. Stitch together through all layers up to the shoulder seam point only.


STEP 5L
Do an understitch on the right side of the lining to hold down the seam allowances, on the lining side only close to the neck seam.


STEP 5M
Turn the jacket out the right way and press the lining and seam allowances down.


STEP 5N
Press the back part of the collar neatly in place, the back neckline seams should be pressed going opposite directions on the OUTER and LINING necklines so as to reduce bulk. Pin together the OUTER and LINING collar along curved seam that joins the collar stand to the collar, making sure that the seams on the inside are sitting neatly and nice and flat, pin together to hold in place.
Pin together the back neckline, making sure the LINING and OUTER neckline seams match as closely as possible and that the seams are going opposite directions to reduce bulk. Hand stitch together along the back neckline and the collar stand seam, joining together the OUTER and LINING collar pieces neatly.
Finally pin down the back neck facing to the back lining and pleat so all layers are held neatly in position. Hand stitch the bottom part of the curve near the binding, around 12cm / 4.75”, to hold all layers together. The stitching should not be visible from the outside of the garment.


