This is a simple boxy top made using zero waste pattern cutting which I would like to share for anyone that wants a little project over the holidays. This is a free pattern, I have included the cutting plan as well as the step by step sewing instructions in this tutorial. I am currently traveling with my family and living out of a suitcase (back in Australia visiting family and friends for the first time in 5 years!) so this whole garment is sewn by hand using minimal tools.
This top is an oversized boxy shape with a straight neck and long sleeves with an elastic inserted into the sleeve hem to gather it in. As this is such a minimal shape I would highly recommend using a linen fabric or something that is of a good quality with a nice drape to it.


I first made this design a couple of months ago, the ZW Tent Top , but it was a little different with a crew neck and a binding finish (which I will also share a tutorial for in the coming weeks). As I am sewing this one by hand I wanted to make sure there were minimal seams and finishes so I simplified the neck making it straight, and eliminated the side seams. This one is great for beginners wanting to try out a zero waste pattern and can be done easily on the go. The great thing about hand sewing is that you can bring it with you anywhere, just like knitting a scarf on a bus, bring your garment with you in a little bag and slowly work away on it while you are travelling to fill in the time. I made this one over a few days in different locations. Photos by Sam Grose.
For this top I used a beautiful peach linen purchased from The Fabric Store on Brunswick Street in Naarm (Melbourne). This store used to be one of my favourite local fabric shops when I lived here and I miss it so much! Always so many beautiful things to choose from.


FABRIC WIDTHS
This pattern works well for a fabric width between 135-145cm. The cutting plan shows measurements for using a 135cm wide fabric and also includes instructions to change the measurements when using other widths.
FABRIC USAGE
I have used a length of fabric for this that is 115cm long however you can easily adjust the lengths to suit your needs. When using different fabric widths the finished length of your sleeve may change a little so keep this in mind.
SIZING
This is a one size fits most where the fabric width determines the finished garment size. To work out wether this will fit your own measurements measure your fabric width then remove 20cm. This will give you the maximum bust/hip measurement suitable for the fabric width you are using. For example if you are using a 135cm wide fabric the maximum bust/hip is 115cm.
NOTIONS + TOOLS
I went pretty cowboy on this and just used a measuring tape and scissors to cut by eye, but if you have some extras tools to ensure you are cutting straight lines such as a long straight or right angle ruler, and chalk or fabric marking pen, then by all means use these. Your basic tool kit required to make this is:
-a thin elastic, 0.5mm - 1cm wide for the sleeves. You will need x 2 lengths of around 22 cm each (for this one I had one long length which I cut to size at the end, after inserting it into my sleeve hems)
-Hand sewing thread
-Hand sewing needle
-Pins
-Fabric scissors
-Measuring tape
PRESSING SEAMS: If you have an iron great, otherwise you can finger press the seams. This technique works super well with a linen fabric. To finger press your seams simply put your garment on a flat surface, with the right side of your garment facing up so you can see the finished seam edges, and press down all the way along the seam with your finger. When the sewing instructions specify to press a seam you can do this either with the finger pressing technique, or an iron.
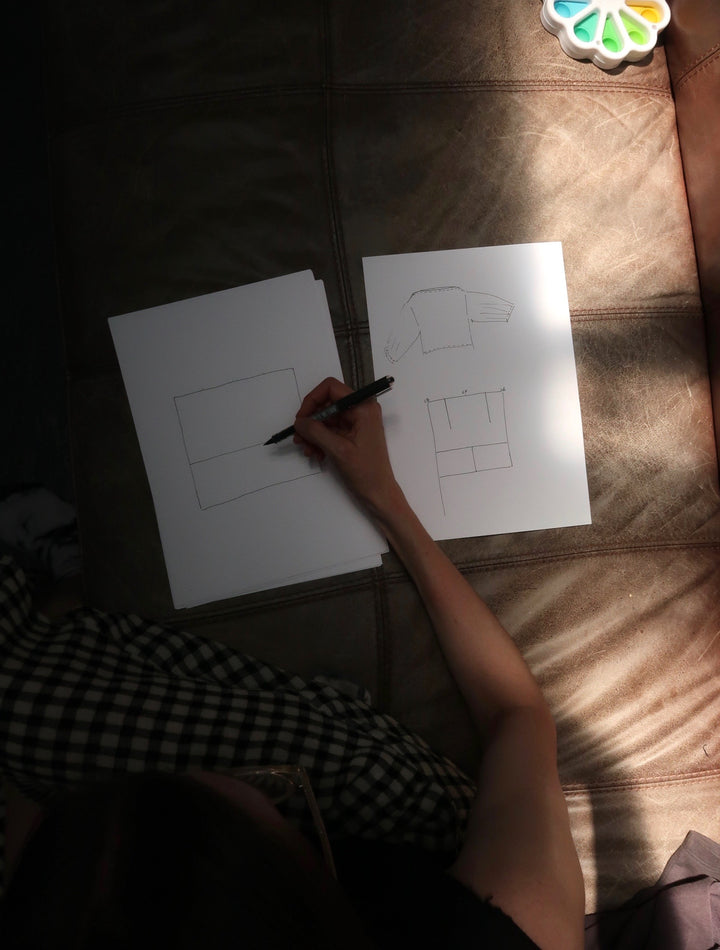
CUTTING PLAN
When working out the pattern for this one I wanted to make it as simple as possible with minimal seams so I played around a little to figure out the best way to go about it. In the end I eliminated the side seams and used the selvage edges as the centre back seams, If you can keep the selvage edges on this one as you can use them in a creative way to finish many of seams so that they do not fray.
The pattern/cutting plan below shows the measurements required for a 135cm width. If you are using a different fabric width instructions are included at the bottom of the cutting plan for measurements A, B,C,D and E. All other measurements can be the same for all fabric widths. For example if you are using a 145cm width and you want to calculate measurement B do the following : 145cm divided by 2 minus 1cm = 71.5cm.
To change the lengths of the Front and Back body and Sleeves simply add or remove the desired length.

CUTTING STEPS
Cut your fabric to length, 115cm as shown above, or to your preferred length. Make sure that the ends have been straightened off neatly. I cut mine on the floor and was battling kids and dogs for space, but I managed in the end!
STEP 1
Fold your fabric in half, selvage to selvage and right sides together making sure everything is sitting nice and straight.

STEP 2
Measure your sleeve length and cut apart your sleeves, making sure it is the same length all the way along. Then cut apart your sleeves along the fold line, your sleeves should be equal halves of your total fabric length.

STEP 3
The remaining piece is your front/back body, the fold line is your centre front. Measure from the folded edge across 33.25cm (if using a 135cm wide fabric) which is half your total front body width. Then measure a line down vertically 33.75cm which is half your sleeve width. Cut this line, this will become your armhole.

SEWING INSTRUCTIONS
STEP 1
Pin the centre back seam in place and sew together with a running stitch taking a 1cm seam allowance, or enough to cover the selvage edges. Your body should already be folded in half with right sides together as this is how you cut this piece out. The selvage edges are perfect here as it means you do not have to finish these edges any more and your fabric will not fray. I did a running stitch going one direction down the seam, and then I went back the other way with a running stitch again to fill in the gaps. Once sewn finger press or iron the seam to one side.


STEP 2
Now that you have your centre back seam sewn you will have 2 straight edges across the top of the front and back bodies. Turn down these edges by 1cm twice, wrong side to wrong side and press and pin in place. Then hand stitch down. I have hand stitched this with a bit of a mixture of a slip stitch and a running stitch by sewing from the wrong side of the fabric, working from right to left, and then alternating my needle going through the folded hem edge and the garment with around 3-5mm between each stitch. The stitch line will be visible from both sides.


STEP 3
Now place the garment with the top edges together, right sides of the fabric together. The cut out armhole slits should be on the left and right side and the centre back seam should line up with the centre point of the front body. Pin together the shoulder along the top edges on the left and right side. The amount will vary depending on your fabric width and your preference. Start with pinning around 15cm on each side then try the top on to check how it is sitting. The middle open part that remains is your neckhole.


Now working from the wrong side of the garment sew together the shoulders the amount you have pinned. Start from the outer edge on each side (the armhole), as you sew you will need to remove the pins and lay the seams flush together and sew on a slight diagonal alternating the needle on each side as you go. Im not sure if this stitch has a name but you can hopefully see by the photos below how this is done.
Once you have sewn on the inside turn your garment to the right side and sew back the other way in the same fashion, make sure that you do a couple of extra stitch at the neck point to add strength here then sew back towards the armhole.


STEP 4
Sew your sleeve underarm seams. Fold one sleeve in half, right sides together, one side of the sleeve should be along the selvage edge and the other along a raw cut edge. Place the raw cut edge around 5mm away from the selvage edge and pin in place. hand sew with a 5mm seam allowance away from the raw edge (approximately 1-1.5cm away from the selvage edge) with a running stitch. Finger press the seam making sure that the side with the selvage edge covers the raw edge. Pin in place and do a running stitch around 8mm away from the seam to make a feature top stitch along the seam. Repeat for the other sleeve.


STEP 5
Lay your body flat and place one end of your sleeve against the armhole, I have offset the underarm seam so that it sits into the back body by around 8cm up from the underarm point, to reduce bulk. Measure to see that your armhole cut-out is the right length and cut into it further if needed. The armhole cut out should be exactly the same length as your finished sleeve width folded in half.


Now turn the body wrong side out and slide the sleeve inside the armhole, right side to right side, making sure that the sleeve underarm seam is on the back part of the armhole. Pin the sleeve into the armhole, extending the raw edge of the sleeve out past the raw edge of the body armhole by 1.5cm. Pin the underarm as shown in the photos below. Sew with a 5mm seam allowance with a running stitch, finishing the underarm part into a point shown in the photos below.


Turn the sleeve edge that extends past the body armhole down twice, making sure the final folded edge sits just on top of the running stitch you have just sewn. Pin in place and sew the folded edge down with a running stitch alternating the needle between the folded edge and the body armhole seam you just did, with around 5mm between each stitch. Turn your top the right way out and press the seam down into the sleeve side.


STEP 6
Try your top on and determine how long you want your sleeves to be. I have pinned mine up approximately 4cm. Press the hem amount up all the way around then turn in the end 1cm and press. Put your elastic inside the folded edge of the hem and pin the hem in place making sure you leave the ends of elastic coming out together, as shown in the photos. Hand sew your hem down with a running stitch alternating your needle between the folded hem edge and the sleeve with around 5mm between each stitch. Leave a small opening where the elastic is coming out and pull in the elastic to your desired size then tie a knot to hold together and trim away excess. If your elastic is too wide to tie a knot you can instead cut to the desired size and overlap the elastic ends by 1cm, then sew ends together securely with a straight stitch or zig zag. finally sew down the remaining hem to encase the elastic fully in the sleeve.


STEP 7
Finally turn the hem up to your preference, I have turned mine up 1cm plus 1cm. Press and pin in place. Hand sew down with a running stitch alternating your needle between the folded hem edge and the body with around 5mm between each stitch.


Now you have a finished top! Wear loose or twist and tuck in at the front to add shaping at the waist.


